Log in to your advertiser dashboard, and click ‘Contacts’.
You will see this table below:
Here, you can see the list ID number, list name, keywords assigned to the list, the coupon included (if there is one), the date the list was created, and you can click to edit the list and click to view the opt-ins.
To create a list, click the ‘Create New’ button located above the table.
Getting Started
You will be taken to a new page, and below will be the first boxes of information you see. Start off by giving your opt-in a list name. This should be the name of your business.
You can see here you have the ability to add multiple keywords if necessary, and request a new keyword if you don’t have enough keywords, or don’t have the one you want for this list. Click the Add -> button to select the keyword your users will text in to 71441.
Requesting a new keyword
Upon clicking ‘Request a new keyword’,you will be taken to the keywords page. Please refer to the keywords guide for instructions on requesting and leasing keywords. This will be the table you see, and allows you to check the availability of the keyword you want.
When you are finished with the keywords page, click ‘Close’ in the top right hand corner of the screen and you will be taken back to the opt-in list wizard to continue on making your opt-in list.
Next, put the name of the Program sponsor or a title to describe the opt-in list as well as a brief description stating the list’s purpose. Indicate the number of messages per day, week, or month that you plan to send.
Adding a coupon
Next, click to include a coupon if you’d like. You can choose between active and pending coupons and you will see a preview of each coupon before you add it.
* Note: Our opt-in list feature prevents users from abusing the system. If a user opts-in and receives the attached coupon and opts out of that list, then subsequent attempts of opting-in will result in the user only receiving the welcome message without the attached coupon.
Click ‘Close’ in the top right of the pop-up window to finish adding the coupon, and an ID number will show up.
Next, you can add an auto-reply message for subscribers who have already opted in to the list.
Notifications
Indicate where you would like the notification to be sent to explaining that you have a new opt-in. Each time someone opts in to this list, the mobile numbers and e-mail addresses you indicate to the right will be contacted. Be sure to separate the mobile numbers by semicolon. Each mobile number will receive a message indicating the new opt in, list name, phone number, time, and date.
When you are finished with your list, click ‘Save’. The list will be available in the table of opt-in lists you have created so far.
To view the numbers that have opted in to a list, click ‘View’ under the ‘Participants’ column. Here, you can view and update their personal information, delete the number from the list completely, and see what time they registered/opted in:


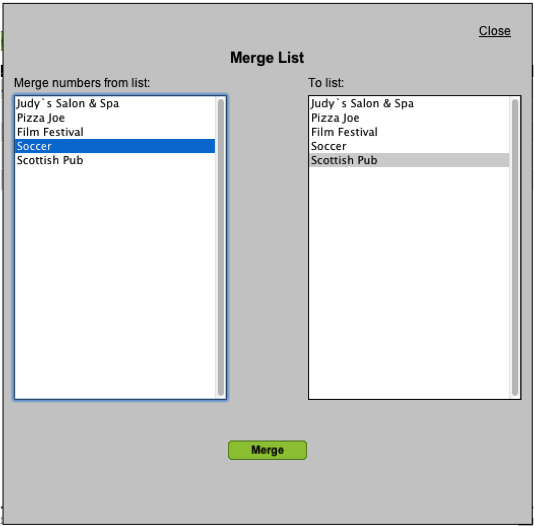
When you click to copy or merge opt-in lists, a pop-up like this will come up. Select the Opt-in list on the left and merge them to the list you select on the right. Once you click ‘Merge’, you will be asked to confirm the transfer of numbers from one list to another. The list you’ve selected on the left will be deleted. All participant info will be transferred, and the participants transferred from the deleted list will be listed as opting in at the time that you merged the two lists together. Copying lists involved copying numbers from one list to another, so make sure you have the list created that you want to copy these mobile numbers to. These numbers’ participant information will also be copied to this list, and their opt-in/registration times will also list as the time you copied the numbers from the original list.
A Lead list is like an Opt-in list in that the users text a keyword to be registered to the list. An opt-in list is a subscription of sorts; mobile device users will text in to receive text message updates, coupons, etc. Its purpose is to inform its audience sporadically over time of sales, events, alerts, special offers, contests, etc. and also ask them for their opinions with our polling feature, and ask yes/no, true/false, confirm/reject, and attend/miss questions with our questionnaire feature. These are just some of the reasons and capabilities of opt-in lists.
Lead lists, on the other hand, are better suited for one-time sales and transactions. For instance, a user may text a keyword to register into a lead list to express interest in seeing a property for sale by a real estate brokerage. They can also include a message containing about themselves, a question, etc. in the SMS after the keyword. The broker will receive the user’s information immediately and can contact them to give details on the property and arrange to show them the house. It is a means of establishing quick contact between buyer and seller.
To view leads, go to ‘Contacts – Leads’ under the ‘Manage’ column in the advertiser dashboard. Here’s an example of what you will see:

Here, you can see the list name, keyword associated with the list, coupon included, date the list was created (according to eastern standard time), you can click to edit the list, and view participants as well.
Click the ‘Create New’ button to create a new lead list. You will be taken to the lead generator wizard:

Enter in your list name and assign a keyword to the list. If you need a specific keyword that is unavailable in the dropdown menu, click ‘Request a Keyword’ and you will be taken to the keywords page. You can request as many keywords as you want, when you are ready to continue creating your lead list, click ‘Close’ in the keywords panel and you will be taken back to the wizard.

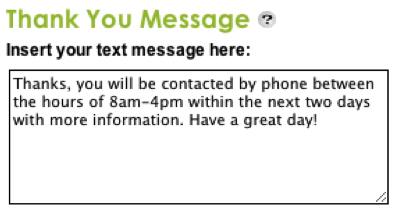
Next, enter a thank you message giving details of how and when they will be contacted. A preview of the message will be seen to the right of this box.

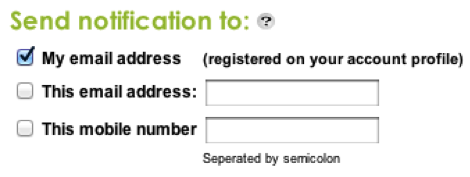
Specify to which e-mail addresses and which mobile number the notification will be sent to.
A notification message will be sent to the specified e-mail/phone containing the list name, the phone number, data (users can enter in a message after they enter in the keyword, this message shows up in the system as ‘data’), and the time and date the lead texted in. Lastly, it is an option to add a coupon. Refer to the opt-in list section of this guide for instructions. When you are finished creating the list, click ‘Save’ and it will be available to edit and view like the other lists.
To edit lead information, click ‘View’ under the ‘Participants’ column for the desired list. You will see this:

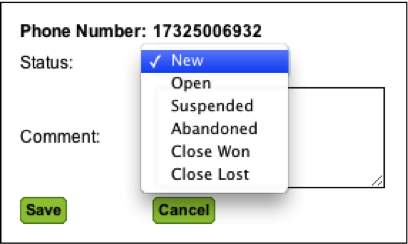
You will see the full phone numbers, the data (message after keyword), the time the number texted in to the list, comments added and the lead’s status. If you click the edit icon (pencil) under status, you can enter in comments for the lead and update the lead status:

Change the status from a new lead to an open lead, suspended, abandoned, close won, and close lost. Remember to click ‘Save’ to update the status information. You also have the option to delete participants if the lead goes cold or the user accidentally texted in.

0 Comments